Caramel Zucchini Coconut "Cheese"cake

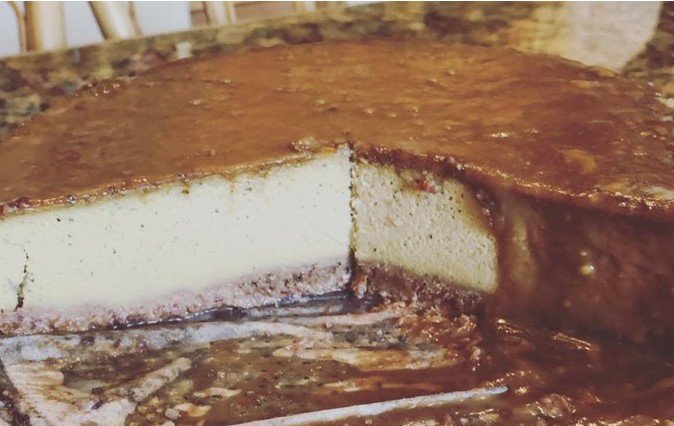
This is one of my favourite desserts to make. I love the ingredients, I feel really good about serving myself a nice big piece of this cake. It’s tasty, as well as nourishing.

I know by rambling on for hundreds of paragraphs like other recipe bloggers do that I would get better traction on search engines, but I do this for you, loyal viewers, and not for click bait, so I refuse to make this post unnecessarily long.
Here’s the recipe for the damn delicious cake: (I usually 1.5 the ingredients to make a very large cake)

Base:

  • 3/4 cup of almond flour

  • 1/2 cup arrowroot powder

  • 1 Tbsp coconut flour

  • 1/2 tsp baking soda

  • 1/4 tsp salt

  • 1/4 cup melted coconut oil

  • 1 tbsp molasses

Preheat your oven to 350 degrees F.
Combine your dry ingredients. Add wet to dry and mix until dough forms.
Roll out the dough between two pieces of parchment.
Bake on a cookie sheet for 10-12 minutes until golden and edges slightly darkened.
Once cooled, put into a food processor and make into crumbs.

Once you have your crumbs, mix in an egg white and combine thoroughly. Press this into the base of your springform pan. Bake it for 15 minutes and allow to cool before adding filling.

Caramel Sauce:

  • 1/2 cup of butter

  • 3/4 cups coconut sugar

  • 2 Tbsp liquid from coconut cream can

  • 2 Tbsp coconut cream

  • 1 tsp vanilla extract

To make this sauce, combine all ingredients in a saucepan and heat until the butter is melted, it’s smooth and thickened (3-5 minutes).

Filling:

  • 1 cup of raw cashews that have been soaked overnight

  • 1/2 lb of zucchini, peeled and chopped

  • 3/4 cups of your caramel sauce (remember to reserve 1/2 cup or so to top the cake when finished)

  • 1/2 cup coconut oil

  • 1/2 cup coconut cream

  • 1/4 cup lemon juice

  • 3 large eggs

  • 1 tsp vanilla extract

  • 3 Tbsp arrowroot starch

To prepare the filling, put the ingredients in a high-powered blender such as a Vitamix and blend until smooth and creamy. Pour your filling over the prepared crust. Your springform pan should be properly prepared on a square of aluminum foil which is folded up to cover the sides. Place your springform pan in a hot water bath and bake in the oven for20-30 minutes at 350 degrees F, then turn down the oven to 250 and bake for another 90 minutes until the center is completely set.
I always turn off the oven, pop the door a crack and allow it to fully cool in the oven to avoid any cracks.

Once you’ve removed it from the oven and the hot water bath, you can pour the remaining caramel sauce on top and chill in the fridge for at least 6 hours, or overnight, to fully set.

Enjoy!!

Fool Proof Home-made Pumpkin Pie


Whenever Autumn rolls around and our communities are decorated with pumpkins standing bright and orange in cheerful contrast against the dreary grey of rainy days, I start to crave pumpkin pie.

Maybe it’s thanksgiving memories, or maybe it’s the warming spices, I’m not sure, but it’s delicious and can be made into a fairly healthful dessert with the right ingredients and a little extra love.

pie recipe.jpeg


Since most of the pumpkin pie recipes involve candensed milk (not my preference) I decided to seek out and perfect the perfect recipe that matched the quality we want for our foods. After many years of making this pie, I know you’ll enjoy it too!

Crust Ingredients:
1/3 cup of cold organic butter per every 1 cup of sprouted spelt flour and 1tsp of Himalayan salt. Approximately 5-7 tbsp of very cold water.

Crust directions:

You can either use a food processor, putting in the flour and salt, adding cubes of butter and than mixing well before slowly adding enough water that it forms a ball OR, you can use the trick my mom taught me: Place your flour in a bowl with the salt, whisk briefly, and than use a cheese grater to grate the butter over the flour and than you can use your hands to combine and break up the butter into the flour. Than add just enough water again until it easily forms a ball you can split and roll out to fit your pie pans.

I like to bake my pie crusts for 10 minutes and then pull out of the oven and pour in the pumpkin pie filling and finish baking.

Pie Filling Ingredients/Directions:

1 can of organic pumpkin puree (alternatively you can roast your own pumpkin and use, I find I need less whipping cream as the squash will be a bit more watery than the canned alternative)

1 1/4 cup of organic whipping cream

2/3 cup of panela cane sugar or unrefined cane sugar of some kind

3 free-range, happy-chicken eggs (large) or use 4 small-medium

1.5 tsp of true cinnamon powder

1/2 tsp of freshly grated nutmeg

1/4 tsp ginger powder

1/4 tsp allspice powder

1/2 tsp of vanilla extract

1/8 tsp clove powder

1/4 tsp salt

Blend all of the ingredients except the whipping cream in the blender, slowly adding the cream last and only blend for a few moments until mostly encorporated (probably not a good idea to blend the cream too long, but I haven’t officially tried to see what would happen). You can use a whisk to finish stirring everything in if necessary.

Pour the filling into your par-baked pie crusts and bake for about an hour at 350’F.

It depends on the size of your pie plates, but generally this recipe will make 2 good size pies or 1 really big one. If I have extra crust I sometimes stick the ready to go pan in the freezer for the next pie or quiche or make quiche or meat pie for dinner.

Enjoy!

Rainbow Salad from Nourishing Traditions

This is one of my all-time favorite salads. It makes a large portion and is perfect for a potluck dinner or if you happen to have a large family, or maybe if you just purposely want left overs! It is so colorful and fresh and reminds me of summer with every bite. It only takes about 10 minutes to chop all the ingredients and 30 seconds to put together the dressing. 

Organic Ingredients:

2 fennel bulbs
2 heads Belgium endive
1/4 head red cabbage, shredded
2 large carrots, grated
1 red pepper, seeded and cut into thin strips
1 cucumber, peeled, cut lengthwise into quarters and thinly sliced
1 heart of celery with leaves, finely chopped
1 small red onion, finely sliced
1 bunch of cilantro, chopped
1 Tablespoon of crispy pine nuts
1 avocado, thinly sliced
1 tomato, cut into wedges or cubes
1/4 lb Roquefort cheese, crumbled (optional, I left this out as I can't find it organically)

Toss all the vegetables together well and add 3/4 - 1 cup of a Balsamic Vinegar Dressing.

Balsamic Dressing:
2 parts Extra virgin olive oil
1 part Balsamic Vinegar
1 heaping tsp of Dijon or coarse mustard.
(shake well in a jar)


You can find this recipe and more in the Nourishing Traditions cookbook by Sally Fallon.
 

Sourdough Waffles 1900's Style

     When I was a little girl we would go out for Mother's Day brunch at a fancy restaurant that served these little home-made waffles with strawberries and whipped cream. I would look forward to those waffles all year. We never had waffles at home unless you count toaster waffles (yuck) or the super white, refined, pre-packaged junk you just add milk to-  you know, the kind that taste like Styrofoam unless they're loaded with maple syrup. Once I learned how to properly prepare foods to maximize nutritional benefits and minimize things like phytic acid, I made it my motherly mission to create the perfect sourdough waffles (of course with garden strawberries, lots of grass-fed butter and whipped cream!) 

     My Waffles are all the better because I finally managed to get my hands on an antique waffle iron from 1908. This thing is heavy duty- it'll never break down, my grandchildren will get to use it, and best of all, no toxic Teflon! 


Ingredients & Method:

I rarely use exact measurements for anything when I cook or bake. But here is how I generally create these waffles:

The night before, add about 1/2 cup- 1 cup of sourdough starter to 2-3 cups of flour. Add enough water that you can stir it into a think dough, incorporating all of the flour, but not making it too liquid, as you'll want to add the milk and eggs, etc. the next morning. 

In the morning, add 2-3 eggs (I like to use at least one duck egg), 1-2 Tbsp of melted butter, and a pinch of salt. Get that stirring as best you can (It will be thick and difficult to mix at first). I then add a little bit of milk and start using my hand blender. I keep adding a bit of milk until I have the proper consistency (not too thin, but not so thick that it doesn't easily pour). You can test the consistency using a ladle to see how thickly it pours. 

 For sweet waffles, I add cinnamon and vanilla extract, sometimes a bit of nopal cactus powder if I have it to help with blood sugar balancing. For savory waffles, I add grated carrot or zucchini, Parmesan and garlic granules. Savory waffles can be topped with eggs or tomato jam or anything your imagination and taste buds can think of!

I make sure my pan is nice and hot and well buttered when I put on my batter and I generally cook for 2-3 minutes on each side. The second side takes slightly longer than the first. If you are using a modern waffle iron, of course there is no rotating of sides involved.

    These are waffles you can feel great about serving to your family! We make them anytime there is a birthday, or special holiday, or an abundance of strawberries! I hope you enjoy these as much as we do! 


Raw Milk Holiday Egg Nog

Raw Holiday Eggnog!
6-8 egg yolks from healthy free range hens
2-4 cups of raw milk (or Avalon Old Fashioned Standard if raw is unattainable)
1/2 tsp of FRESHly ground nutmeg
a pinch of clove powder
a pinch of cardamom powder
1/8 tsp cinnamon
a pinch of allspice powder

Directions: Separate eggs. Place yolks into the blender with other ingredients and blend until well incorporated and creamy. Serve and enjoy!

Homemade MarshMallows

Okay so technically these aren't "healthy"- but they are a heck of a lot better than anything you could purchase from the store. Once a year, when we go camping, I make these as an extra special treat. You could also consider using this to make your own version of a "wagon wheel" if you ever felt called to do so. I have even experimented with adding real Althea root powder (marshmallow root) to this recipe and it worked out well.

marshmallows

Organic homemade marshmallows! 
8 sheets of organic gelatin
1/2 cup cold water
2/3 cup honey
1 and 3/4 cups Org. Raw Panela sugar
1/4 tsp salt
1/4 cup water
1 tsp organic vanilla extract.
Organic Icing sugar, Lucuma powder to coat.

Directions:

 Line a 9x12 pan with parchment. Soak gelatin in electric mixer with 1/2 cup water for ten min. Boil sugar, honey, and 1/4 cup water for a minute. Add boiling sugar mass to gelatin in mixer, add salt and beat on high for 12 minutes. Add vanilla on last minute. Pour into pan, cover and set min 3 hours in fridge. Coat cutting board with powder of choice and slice and coat. Enjoy.


Raw Turkish Delight

turkishdelight

Raw Turkish Delight:
1 cup of blueberries
1/2 cup chopped hazelnuts or favorite nuts
1 cup hot water
1 tablespoon agar agar flakes or 3 soaked chunks of it
1 Tablespoon raw honey
3 mejool dates
Lucuma Powder

Method: 
Blend dates, honey and blueberries until smooth.
In a saucepan, simmer agar agar and hot water until dissolved.
Add agar water to blender and blend. Then stir in chopped nuts. Line a small rectangular container with parchment paper and pour in mixture. Set in freezer for an hour. Remove, slice into cubes, roll into lucuma powder to coat and ENJOY!